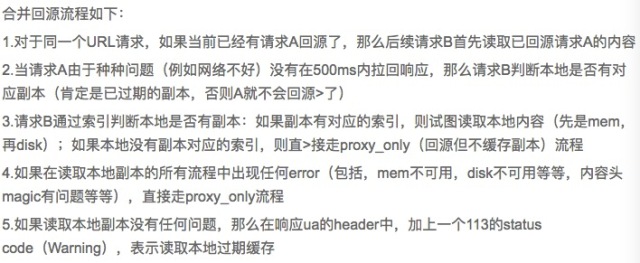
ats 合并回源问题

ats 版本 5.3.2

1.ats 查找机制

2

2.ats合并回源的机制

3

3.当第一个回源请求超时(本节点带宽跑的比较满,回源线路不是很好,源站响应慢,源站偶尔响应慢等很多情况),然而本地又没有缓存的时候,其他相同的请求就会穿透回上层cahe,或者源站,导致回源量一下上升很高;

1

4.解决思路:

a. 高级版本的ats 自身加了 超时配置,以及retry次数配置,另外还有Collapsed Forwarding Plugin  当返回502时去解决类似的问题;

b. 6.X之前的版本自己改改配置,增加retry次数

proxy.config.cache.read_while_writer.max_retries 默认 10次,大概最多耗时1s

ats return 400 Multi-Hop Cycle Detected

3层架构: 边缘 >> 上层 >> 源站

问题:上层请求正常回源,返回200 ,然后再请求边缘,如果上层命中,边缘也是200;如果上层是Miss,边缘就会返回400 Cycle

打开DEBUG 日志 对比正常的200 跟400 请求的日志,会发现

200:DEBUG: (http_seq) [HttpTransact::OSDNSLookup] DNS Lookup successful

400:(http_transact) [will_this_request_self_loop] Incoming via: http/1.1 EACNCTC_JLJ_*****[C0A80AC9] (ATS) has (EACNDWN_HBE_****[C0A80AC9] (ATS))

解决方案:

当请求进入的时候,把via 头删除,然后再试就OK。

暂时不知道什么原因,囧,后面有能力再看看代码

trafficserver 后端回原限速插件

limit_rate

主要参考和更改 纸鸢 开源的限速插件 https://github.com/cnkedao/trafficserver-ratemaster

limit_rate是一个remap插件,分时间段进行限速,0hour=1048576 代表00点 限速为1048576字节/s:

For example:

map http://xie.test.cn http://xie.test.cn @plugin=/xxx/trafficserver/libexec/trafficserver/balancer.so @pparam=–policy=roundrobin @pparam=127.0.0.1 @plugin=/xxx/trafficserver/libexec/trafficserver/limit_rate.so @pparam=/xxx/limitconfig.config

limitconfig.config:

0hour=1048576
1hour=1048576
2hour=1048576
3hour=1048576
4hour=1048576
5hour=1048576
6hour=1048576
7hour=1048576
8hour=1048576
9hour=1048576
10hour=1048576
11hour=1048576
12hour=1048576
13hour=1048576
14hour=1048576
15hour=1048576
16hour=1048576
17hour=1048576
18hour=1048576
19hour=1048576
20hour=1048576
21hour=1048576
22hour=1048576
23hour=1048576


github 地址: https://github.com/xieyugui/limit_rate

trafficserver 后端回源 增加主备、权重和https回原

改插件功能主要在balancer 基础上进行了更改,主要参考nginx upstream

github 地址:https://github.com/xieyugui/balancer

balancer

具体用法:请参考https://docs.trafficserver.apache.org/en/latest/reference/plugins/balancer.en.html

在roundrobin 模式下新增 backup、weight、max_fails、fail_timeout ,以及add path和开启https回源的功能:

backup=number

marks the server as a backup server. It will be passed requests when the primary servers are 
unavailable.by default, 0    --(0/1)

weight=number

sets the weight of the server, by default, 1.

max_fails=number

sets the number of unsuccessful attempts to communicate with the server that should happen 
in the duration set by the fail_timeout parameter to consider the server unavailable for 
a duration also set by the fail_timeout parameter. By default, the number of unsuccessful
attempts is set to 3. The zero value disables the accounting of attempts. What is considered
an unsuccessful attempt is defined by the proxy_next_upstream, fastcgi_next_upstream, 
uwsgi_next_upstream, scgi_next_upstream, and memcached_next_upstream directives.

fail_timeout=time

sets the time during which the specified number of unsuccessful attempts to communicate 
with the server should happen to consider the server unavailable; and the period of time 
the server will be considered unavailable. By default, the parameter is set to 10 seconds.

For example:

map http://foo.com http://foo.com @plugin=balancer.so @pparam=–policy=roundrobin @pparam=–https @pparam=one.bar.com:80,0,1,3,10 @pparam=two.bar.com,0,1,3,10

Add path:

map http://foo.com http://foo.com @plugin=balancer.so @pparam=–policy=roundrobin,0/ @pparam=one.bar.com:80,0,1,3,10 @pparam=two.bar.com,0,1,3,10
if client request http://cdnxxx.com/1.jpg then ATS will back to the source server request http://cdnxxx.com/0/1.jpg

trafficserver plugin 创建和编译学习

ATS Plugin 编译指南
ATS的plugin编译方法有两种:
inside 与ATS源代码树整合,在plugins目录中编译
outside 使用tsxs工具编译
Inside方式
在plugins目录创建一个目录my-plugin,然后在该目录内创建一个Makefile.am,内容如下:
# Licensed to the Apache Software Foundation (ASF) under one
# or more contributor license agreements. See the NOTICE file
# distributed with this work for additional information
# regarding copyright ownership. The ASF licenses this file
# to you under the Apache License, Version 2.0 (the
# “License”); you may not use this file except in compliance
# with the License. You may obtain a copy of the License at
#
# http://www.apache.org/licenses/LICENSE-2.0
#
# Unless required by applicable law or agreed to in writing, software
# distributed under the License is distributed on an “AS IS” BASIS,
# WITHOUT WARRANTIES OR CONDITIONS OF ANY KIND, either express or implied.
# See the License for the specific language governing permissions and
# limitations under the License.

include $(top_srcdir)/build/plugins.mk

pkglib_LTLIBRARIES = my_plugin.la
my_plugin_la_SOURCES = my_plugin.c my_plugin.h utils.c utils.h
my_plugin_la_LDFLAGS = $(TS_PLUGIN_LDFLAGS)
pkglib_LTLIBRARIES 指定了输出的*.so的文件名,所以我们的插件名称不一定要与插件的目录名称相同。
通过插件名称_la_SOURCES/LDFLAGS/DATA 来指定插件的对应源文件、编译连接时的参数等。但是当插件名称中出现中横线(-)时,这里我们需要用下划线(_)来代替。

需要注意,在install-data-hook部分,每一行必须以<TAB>开头。
然后打开plugin/Makefile.am, 将my-plugin目录添加到SUBDIRS里。
然后打开configure.ac,找到plugin/Makefile这一行,在下面新增:
plugins/ats-auth/Makefile
plugins/my-plugin/Makefile #add
然后重新运行autoreconf -fi 就会看到my-plugin目录下生成了Makefile

Outside方式
在任意位置创建目录my-plugin,然后在该目录内创建如下脚本,注意指定已经安装的ATS的目录以及ATS源代码所在的目录。

#!/bin/sh

[!”$ATSSRCDIR”] && export_ATSSRCDIR=/root/trafficserver
[!”$ATSINSTDIR”] && export_ATSINSTDIR=/usr/local/trafficserver

TSXS=${ATSINSTDIR}/bin/tsxs
FLAGS=”-I${ATSSRCDIR}/lib -I${ATSSRCDIR}/lib/ts -I${ATSSRCDIR}/proxy/api/ts -I${ATSSRCDIR}/proxy/api”
LIBS=”-lssl -ltsconfig”
INFILE=”my-plugin.c utils.c”
OUTFILE=”my-plugin.so”

# compile
${TSXS} ${FLAGS} ${LIBS} -o ${OUTFILE} -c ${INFILE}

# install
${TSXS} -o ${OUTFILE} -i

# copy config file
cp my-plugin.config.default ${ATSINSTDIR}/etc/trafficserver/my-plugin.config

然后,在该目录内编译源代码,调用上诉脚本即可实现对源代码的编译,同时安装插件到ATS的插件库目录。
如果需要连接第三方的扩展库,如openssl库等,可以使用:
my_plugin_la_LDFLAGS = $(TS_PLUGIN_LDFLAGS) -lssl
如果需要连接ATS的API库,如tsconfig,可以使用:
my_plugin_la_LDFLAGS = $(TS_PLUGIN_LDFLAGS) -L$(top_builddir)/lib/tsconfig/.libs -ltsconfig

注意:源项目需要更改一些文件

cp /test/trafficserver-6.0.0/lib/ts/apidefs.h.in /test/trafficserver-6.0.0/lib/ts/apidefs.h

cp /test/trafficserver-6.0.0/lib/ts/ink_config.h.in /test/trafficserver-6.0.0/lib/ts/ink_config.h

cp /test/trafficserver-6.0.0/lib/ink_autoconf.h.in /test/trafficserver-6.0.0/lib/ink_autoconf.h

ATS API的头文件
ATS API的头文件保存在${ATSINSTDIR}/include/ts目录。
这些头文件都来自ATS的源代码的 ${ATSSRCDIR}/libs/ts 或者 ${ATSSRCDIR}/proxy/api/ts 目录。
但是有一个特殊的 mgmtapi.h 来自 ${ATSSRCDIR}/mgmt/api/include 目录。

在Plugin中引用的头文件
编写Plugin时通常我们只需要使用ATS API 的头文件,此时在Outside方式下,FLAGS不需要设置,也不需要制定ATS源代码的路径。
通过TSXS工具编译源代码时,TSXS在调用gcc时,会自动添加参数-I{ATSINSTDIR}/include来实现ATS API库的头文件目录的指向。这个参数会被放在第一优先级。
因此当我们在编写plugin需要include源代码是时,用ts/xxx.h和atscppapi/xxxx.h来表示引用ATS API库的代码。

当我们编写复杂的Plugin时,往往需要使用ATS源代码中的内部API及头文件,此时为了不与ATS API 的头文件引用冲突(特别是同名但功能不同的头文件),在Outside方式可以通过指定FLAGS参数实现对内部API及头文件的调用:
-l${ATSSRCDIR}/lib
使用tsconfig/xxxx.h来表示引用ATS源码lib/tsconfig目录的头文件。
-l${ATSSRCDUR}/lib/ts 和 -l${ATSSRCDUR}/proxu/api/ts
使用xxxx.h来表示引用ATS源码lib/ts目录和proxy/api/ts目录的头文件。
对于Inside方式,则不会使用安装后的ATS API库,因此在build/plugins.mk中指定了:
-l$(top_srcdir)/lib
使用tsconfig/xxxx.h来表示引用ATS源码lib/tsconfig目录的头文件。
使用ts/xxxx.h来表示引用ATS源码lib/ts目录的头文件。
-l$(top_srcdir)/proxy/api
使用xxxx.h来表示引用ATS源码lib/ts目录和proxy/api/ts目录的头文件。
同样可以实现对ATS内部函数以及ATS API库的调用。
按照上诉规则引用头文件,可以保证一个plugin即可以使用inside模式编译,也可以使用outside模式编译。

makefile 文件

TARGET=remove_query

MAIN=-c common.c -c remove_query.c

SRC=$(MAIN)

all: $(TARGET)

install: $(TARGET)_install

clean:

        rm *.lo *~ $(TARGET).so

$(TARGET):

        tsxs -o $@.so $(SRC) 

$(TARGET)_install:

        tsxs -o $(TARGET).so -i


tsxs一般在编译打包后的trafficserver/bin 目录下

学习样例:参考

ATS插件开发入门介绍

cache 大文件分片

最近在研究大文件切片的问题,我们节点使用的nginx+trafficserver的架构,nginx做负载,ats做cache。

在此基础上想出两个方案:

方案一:利用ats 支持插件这个特性,全部功能都放在该插件上,负责根据切片大小,将一个object 根据Content-Length进行切片,然后转化为不同的cachekey存储到cache 中,当然code 要从206 转化200(该功能可以参考cache_range_requests插件),用户请求的时候再进行合并响应。注意要点参考

方案二:就是主要逻辑在nginx 段实现,client连接nginx-(nginx-lua)-nginx-upstream-ats nginx-lua 负载切片,也就是把相同的range块,转为URL ,去通过nginx-upstream hash 负载到后端ats,然后,后端ats 再向源站range 请求,回来修改成200 ,存储 nginx-lua 负载请求不同的URL 片到upstream ,然后再转发给用户

可以参考:Caching range requests using NGINX at MaxCDN

github nginx ranger

最近nginx 刚出的分片模块,由淘宝开源的,可以参考源码思路编写

https://github.com/alibaba/nginx-http-slice

自己比较蠢,误认为nginx 这个分片模块不能针对代理模式下的资源,导致误区,幸好有人实现了,看到了第二种解决方案

https://github.com/oxwangfeng/ats_slice_range

社区分片功能的文档https://www.dropbox.com/s/t0r4c5plp6rd7ii/Partial-Object-Caching-Update-Spring-2016.pdf

研究trafficserver push 功能

前几天想研究一下trafficserver 的push 功能,正好发现bin目录下有个tspush 脚本,就研究了一下怎么用,后面发现官方已经合并到了traffic_primer,而且发现tspush很难理解和使用。于是就看了一下traffic_primer 这个脚本。

该脚本大概实现的功能如下:

Usage: traffic_primer [-cfd] [-u <url>] [-U <filename with URLs>] [-h Host] [-p port] host1 host2 …

[root@localhost bin]# ./traffic_primer -u http://cdnxxx.com/xxx.txt -h 192.168.8.7 -p 80 127.0.0.1

—> http://cdnxxx.com/xxx.txt

Fetching source body …done

Source MD5=9f9f1243fac134d777a91f4b59b90dcb –

Procesing 127.0.0.1:80… purged… pushing… done.

MD5 checksum is good.

-u 是URL http://cdnxxx.com/xxx.txt

-h 源站地址 192.168.8.7

-p 源站端口 80

host1 是cache 服务器 127.0.0.1

该脚本的功能是,先到源站拉去最新文件,放到tmp目录中的临时文件中,再刷新cache,然后push进去,最后md5校验,这样就可以主动push文件了,但是总体来说这个push 功能不如直接get 的好,我们可以考虑一下

限制ats dump 输出的core 大小,以及调试

http://trafficserver.readthedocs.org/en/5.3.x/sdk/troubleshooting-tips/using-a-debugger.en.html

Using a Debugger

A debugger can set breakpoints in a plugin. Use a Traffic Server debug build and compile the plugin with the -g option. A debugger can also be used to analyze a core dump. To generate core, set the size limit of the core files in the records.config file to -1 as follows:

CONFIG :ts:cv:`proxy.config.core_limit` INT -1

This is the equivalent of setting ulimit -c unlimited

不想输出CORE 文件就直接将-1 设置为0

想输出的话,就自己设置了CORE 输出的系统路径,找个大的目录,防止存储被占满

调试方式:

修改文件/etc/yum.repos.d/CentOS-Debuginfo.repo中的enabled参数,将其值修改为1,如:vi /etc/yum.repos.d/CentOS-Debuginfo.repo

yum -y install gdb

yum install nss-softokn-debuginfo –nogpgcheck

debuginfo-install glibc

debuginfo-install libgcc

gdb /xxxx/trafficserver/bin/traffic_server /xxxx/core.16732

上面的bt命令的作用是查看函数堆栈(同where)up和down可以进行上下行的转换,还有其他的gdb命令大家可以自己去学习。

http://www.cnblogs.com/hankers/archive/2012/12/07/2806836.html

#bt p f dir